Welcome to the
Battlestar Candyjar--the Fleet
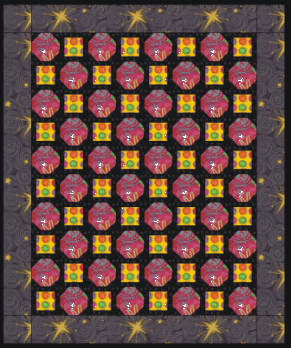
This is a bright, bold quilt that shamelessly takes
advantage of the fact that any bright
looks fantastic on a black print background. Make your leftover scraps POP
and SIZZLE!
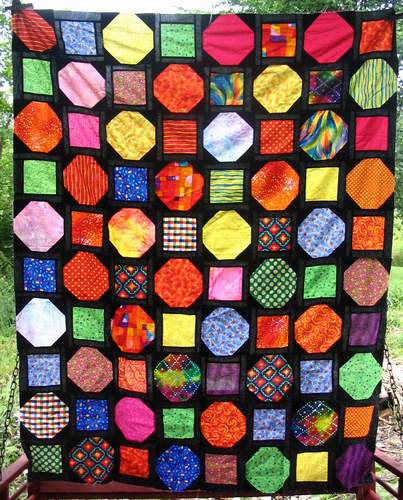
This is a 2-block quilt, and actually sews up rather quickly.
Not interested in black backgrounds? Try any dark--you'll love it!
This is a fantastic way to use kid's prints--and it would be absolutely gorgeous
in batiks.
Supply List:
Sewing Machine
Scissors
Rotary Cutter and Mat
Iron and Ironing Mat
Magic Sizing (a quilter's best friend!)
White pencil or other quilter's marker that will show on the back of the black
fabric.
Warm and Natural Batting, Twin-sized (or any batting you might prefer)
Fabric Supplies:
2 1/2 yards Black print--reads as solid (you do not want a black print
that pops, as it will detract from the candy scraps)
2 Yards Black print that pops for the borders (think black with bright dots
or squiggles!) Maybe stars?
(OR--If you do not want seams in your border, buy 4
yards and cut 4 strips of 6 1/2" lengthwise.)
40--6 1/2" x 6 1/2" scrappy brights. Think candy! As many different
as possible
40--4 1/2" x 4 1/2" Scrappy brights--can be the same as above, if
needed.
3 Yards of Backing: 65" x 80"--you will have to piece.
Step One:
Cut the black fabric as follows:
80--1 1/2" x 4 1/2"
80--1 1/2" x 6 1/2"
160--2 1/2" x 2 1/2"
Step Two: Block #1
Take the 160 2 1/2" blacks and the 40 6 1/2" candy prints
You will be making these using the Flying Geese Method.
Draw a line on the wrong side of all 160--2 1/2" x 2 1/2" squares
with the white pencil.
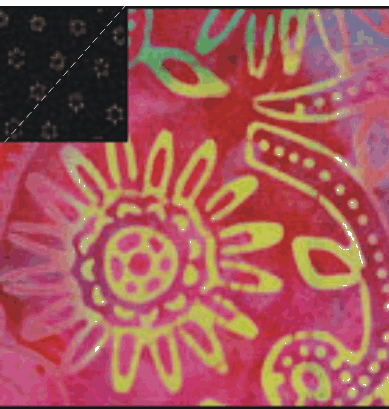
Lay it right sides together on the 6 1/2" candy fabric.
Sew on your drawn line, fold triangle back, and press.
Repeat for the other corners, in the order shown.

Make 40 units. (OK, I said it would be easy, I didn't say it would be
fast)
It is important to press and not iron with
a back and forth motion, and to use the Magic Sizing.
If you are unfamiliar with the special way to press quilt blocks and using
Magic Sizing, there is a link below
for my quilter's web site, Quilt With Two Sissies, that gives more detail.
If needed, trim these blocks to 6 1/2" x 6 1/2".
You may remove the center triangle only. Do not remove the back triangle.
Step Three: Block #2
Take the 80 1 1/2" 4 1/2" and the 80 1 1/2"
x 6 1/2" blacks,
and the 40 4 1/2" x 4 1/2" Candy prints, and assemble as shown.

Make 40 units
If needed, trim to 6 1/2" x 6 1/2", but if you maintain a careful
1/4" seam, it should not be necessary.
Press as you go, before adding the next piece.
Step Four: assemble the rows 10 down and 8 across with Block #1 and Block #2
I suggest laying your quilt out on the floor and moving
the patches around, to avoid
having two of the same print or color too close.
Sew together 40 units as shown.

Once these are done, lay them back out on the floor,
and assemble your rows again.
Now we will sew row by row. You will note that every odd row (1,3,5, etc)
starts with Block #1
and every even row (2,4,6, etc) starts with block #2
You will have five rows that look like the following:

You will have five rows that look like the following:

But remember--YOURS will be all scrappy, and not identical
as these blocks.
I'm using my Quilt Pro 5 Computer Quilting program to make this tutorial,
and so am just using the two prints for easier identification.
Press, and assemble again on the floor, to make sure you are sewing the rows in the order you want them sewn.
Finally, sew your rows together.

Step Five: Adding the Borders
Cut your border fabric into 6--6 1/2" x width
of fabric lengths.
Sew two together for the side rows.
Now, we are planning on a ripple-free border so you will NOT just start at
the top and sew the strips on!
FIRST--measure your top from top to bottom, through the middle. Cut two of
your borders strips to this size.
Now, in theory, all things being absolutely perfect, it should measure 60
1/2"--but do not stress if it does not.
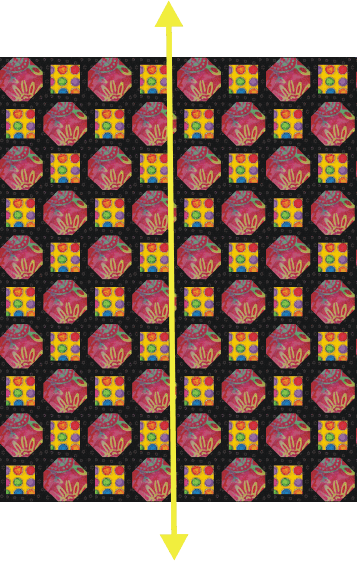
PIN the borders in place as follows: first pin, the
exact middle. Second pins: top and bottom.
Now, if it is not a perfect fit, and there is slight puckering in the top
or border--do not panic!
Just ease the fabric until you have it pinned down every two inches.
I know this is a drag, but believe me, you will be thrilled with the results.
Sew your side borders in place once pinned. Press.
Now, measure across your quilt, including the borders
just sewn on, of course.
Again, this should measure exactly 60 1/2", but if it doesn't, do not
worry!
Following the previous border instructions, add the top and bottom borders.
Yes, you will have to piece these together too.
There! The top is done!
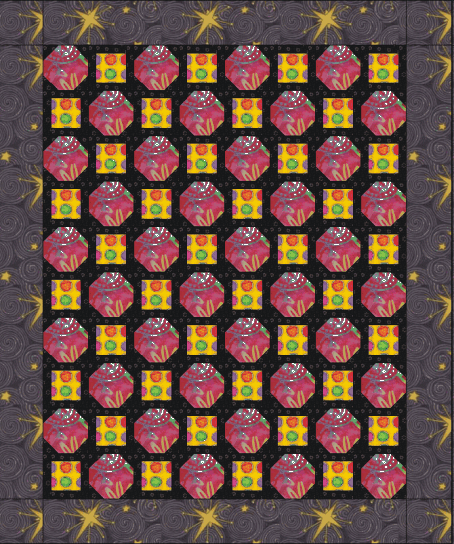
Step Six: Quilting
Piece your backing fabrics to measure at least 65"
x 80".
Layer your quilt as follows:
Backing, wrong side up.
Add Batt centered to this
Add top, centered, right side up.
Now, carefully trim away ONLY the extra batting. Do not cut the top or backing.
Ok--here're your choices:
Hand quilt
Machine Quilt
Take it to a shop to quilt (my choice!!)
If you plan to hand to machine quilt yourself, you
need to baste your layers to avoid slippage.
I use a single thread of the really cheap sewing thread, and make
a grid two inches apart
across, and then up and down.
Once you have A. quilted your quilt or B. got it back
from the quilt shop, You are ready for the binding.
My favorite binding is to trim the backing away to a 1" extra all the
way around, and then fold over 1/4", press,
fold up and over to the top of the quilt pin, pin, pin, and hand sew it down.
You can also buy or make bias binding, if you prefer.
I do not use bias binding on large projects, so can't advise on that!
Links you might find helpful, from my 2 Sissies quilting
site.
Easy Flying Geese